Thursday 15 December 2011

[Carrot and Coriander Soup]


Serves 4 people

Ingredients:
1 tablespoon of vegetable oil
1 onion, chopped
teaspoon of ground coriander
1 potato, chopped
450g carrots, peeled and chopped
1.2ltres vegetable or chicken stock
Handful of coriander (about ½ a supermarket packet)


Method:

  • Heat the oil in a large pan, add the onion, and then fry for 5 minutes until softened.
  • Stir in the ground coriander and potato, and then cook for 1 minute.
  • Add the carrots and stock bring to the boil, and then reduce the heat. Cover and cook for 20 minutes until the carrots are tender.
  • Tip into a food processor with the fresh coriander, then blitz until smooth) may need to do this in two batches).
  • Returns to the pan, taste, add salt if necessary, and then reheat to serve.
This soup is a lovely winter warmer, served with a nice crusty roll. 


Friday 11 November 2011

[Italian – Style Meatballs]


Preparation and cooking time: 1 Hour 10 minutes.
Ingredients
350g/ 12ozs extra lean mince beef
100g/4ozs Red lentils
1 onion, finely chopped
Salt and freshly ground pepper
2 slices of bread (crusts removed)
15-30ml/ 1-2 tablespoons Semi skimmed milk
1 Large egg, beaten
A little flour
50g/1¾ozs sunflower margarine or low fat spread
450ml /¾ pint beef stock
2 teaspoons tomato puree
2 tablespoons cornflour
1 teaspoon vinegar
1 teaspoon fresh chopped parsley (optional)


Method
1. Put the minced beef, lentils and onion into a bowl and mix together.


2. Season with salt and pepper.
3. Trim the crusts of the bread (I used multigrain or spelt) and place in a small bowl. Add the milk and allow the bread to soak for a few minutes. Then squeeze away the excess moisture.
4. Add the bread and the egg to the meat. Mix the ingredients until well blended this is best done with lightly oiled fingers. I prepare mine in advance and put them covered in the fridge as this helps to firm them and I find it makes them easier to cook and not fall apart when cooking.
5. Shape the mixture into 12 balls and roll in the flour with a little salt and pepper added.


6. Melt the margarine or spread in a frying pan and fry the meatballs (sauté) until browned on all sides. Shake the pan gently from time to time so that they do not stick and keep a nice round shape


7. When meatballs are ready lift them out with a slotted spoon and place them ovenproof casserole dish.

8. Pour away the fat remaining in the frying pan and add the stock and tomato puree to the hot pan. Stir and mix well and then bring to the boil but continue to stir.


9. Blend the corn flour with a little water to make a thin paste and add to the sauce; continue to stir while doing this. If is not thickening enough for you then just add some more.10. Check the seasoning then add the vinegar to sharpen the flavour.


This is the finished meal hope that you enjoy it.

Look out for my next blog.

Sunday 6 November 2011

[Butternut Squash Risotto]


This Butternut Squash Risotto was made with local produce which makes this dish so very tasty, I enjoyed preparing and cooking it and it made such a wonderful meal.
Butternut Squash Risotto
Serves 6 people
Ingredients:

2 tablespoons of olive oil
25g butter
1 onion, finely chopped
350g risotto rice

5fl oz.(a small glass) of dry white wine or vermouth (optional)
1 litre of hot stock, chicken or vegetable
75g Parmesan cheese freshly grated
sea salt and freshly ground black pepper
750g butternut squash
fresh herbs- such as chives and flat leaf parsley

 
Method:

Preheat oven at 180°C

  1. Chop the butternut squash into chunks, drizzle with the olive oil and roast in the oven for 20-25 minutes until it starts to brown.
  2. Melt the butter and olive oil in a saucepan then add the onions and sweat gently (do not let them brown) for about 10 minutes with the lid on.
  3. Add the rice and stir for a couple of minutes to allow it to become coated with the flavour in the pan.
  4. Add wine or vermouth if using and simmer for 2-3 minute until it has all been absorbed.
  5. Continue cooking the risotto by adding a ladle of hot stock and stirring continuously until the liquid has been absorbed
  6. Repeat this process until all the liquid has been absorbed- do not be tempted to add all the liquid at the same time. This should take 20-25 minutes. At which point you should have a creamy consistency rice mixture in the pan.
  7. Add the roasted butternut squash and its juices.
  8. Stir in most of the parmesan cheese, reserving a little to sprinkle on the top.
  9. Season to taste with the fresh herbs, sea salt and black pepper and garnish with the remaining parmesan cheese.

Variations: 
  • Crispy bacon is a tasty addition to this recipe. 
  • Alternatively use seasonal vegetables such as peas, courgettes, and asparagus.
  • Or use any variety of mushrooms.
Below I have told you a little bit about Risotto that I have made.

Risotto is an Italian dish using short grain, often Arborio or carnaroli, rice. Different regions in Italy serve risotto with different consistency and so it can range from being quite runny to quite thick-it's all a case of personal preference! Variations include vegetables (often referred to as risotto primavera) seafood, mushrooms, include chicken or leftovers.
If you'd like a richer smoother sauce use home-made stock although stock cubes/ bullion is also absolutely fine. Not only is risotto great comfort food but it is also easy to make, whether that's for 1 or 10 people.

Happy cooking, and hope you enjoy your meal.

Look out for some more of my recipes some will be healthy and low sugar.


Friday 4 November 2011

[Carrier Bag Tube]


Are you fed up with having carrier bags just shoved in each and left lying around?
If you are then this may be the ideal thing for you, a Carrier Bag Tube
I still had some material left over from my previous blog Toilet Roll Holder. 


List of materials you will need to make your own
Piece material measuring 25 x 7 inches
Piece ribbon 5 ½ inches
piece of elastic

_______________________________________________________

Make hems approx 1 inch all round.
When you have sewn the hems your tube should look like this, and now you are ready to insert the elastic in the bottom hem.
If you are using a material that has a pattern on it just make sure that you have it the right way up when doing this. (See
Pic 1)

Pic 1


When you are sewing the hem for the bottom make sure you leave a little gap for pulling through the elastic.
Before you start pulling through the elastic pin one end to the material so when you are pulling it through for the gathering
you will be able to sew the ends together once you are happy with the tightness of the bottom. (See
Pic 2)

Pic 2


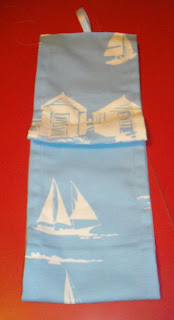
Your Carrier Bag Tube is now completes and should now look like this when finished.

Finished


Now all your carrier bags you had lying around can now be put into the tube.


Watch out for my next blog as it will be compleatly differant!
 

Monday 31 October 2011

[Toilet Roll Holder]


I made some bathroom curtains and I had some material left over and did not know what to do with it. Then an idea came tinto my head, a toilet roll holder to match, so that's what I did.

List of materials you will need to make your own
Piece material measuring 37 x 7 ½ inches
2 Toilet rolls (not cheap ones)
Piece ribbon 5 ½ inches


To start making the holder:
Lay the material with the inside showing upwards, and turn in both the sides at 1inch then machine or hand sew down. See Pic 1 
Pic 1


Now you are ready to make the pockets:
Measure 10 ½ inches in from one end, and then place the toilet roll, take the other end and fold it over the roll when doing this make sure that you do not pull it tight
as you need to be able to fit the roll in pocket with ease. Pin in place then again machine or hand sew in place. See Pic 2 
Pic 3


You are now ready to place the other roll:
Place the roll alongside the other one and then pull over the material as you did before again not too tight. With the two ends fold them in together and make it as close to the roll making sure you put the ribbon in the centre then machine or hand sew in place. See Pic 3 
Pic 3


Your toilet roll holder is now completes and should now look like this when finished.


Finish 1
Finish 2

Remember you can use any fabric you like to make one of these, and you can make it  well within 1 hour. It is just something that makes your bathroom or toilet room look decorative.


Sunday 11 September 2011

[Poppy Bookmark]


I was looking in a craft shop and I saw this bookmark, I like poppy's so I decided to make it and this is the finished bookmark. 


I think this will look lovely inside a page when opened. In fact a friend saw it liked it very much so I gave it as a gift.

[ Baby’s Room]


My Daughter is having a baby soon and she asked me if I could make some animals in cross stitch.


I am pleased with the way the cross stitch has turned out as I found it difficult to match the colours to the orignail pictures.